|
|
|
Spring Mailbox

This tutorial was created by Marianne~ on Mar.18th, 2003 please do not take any of the images or ex. in this tutorial. You may use a TEXT LINK only for a group but do not upload the tutorial to your site or email it. Thanks so much. This is just showing you how I created mine how you decorate it is your final decision and what YOU create is yours. :) I hope you enjoy doing this tutorial as much as I have.
These are the supplies we will need :)
Jasc Paint Shop Pro. You can get it here and it is only a 30 day trial.
My selections files. You can get them here.
My wood pattern just right click and save to your computer :)

Ok now that we have all the supplies lets begin. This is a long tutorial so don't forget to save often in case I forget to say it. I am presuming you are.
1. Open a new image 707 x 939 transparent. I like to go big that way you can see what you are doing :) We will resize later.
2. Add a New Raster Layer.
3. Go to Selections / Load from Disk/ leftpetal1.sel
Floodfill with Foreground color #008000
4. Selections / Select none.
Save
5. Layers /New Raster Layer
6. Selections / Load from disk /petal1shade.sel
Floodfill with Foreground Color #004000
7. Selections / Select None.
8. Layers / New Raster Layer
9. Selections / Load from disk / leftstem1.sel
10. Floodfill with #004000
11 On the same layer go to Selections / Load fromdisk/ ltstemshade1.sel
Flood fill with Foreground color #008000
Selections / Select none.
Save.
12. Layers /New Raster Layer
13. Selections / Load from disk/ leftbottom1.sel
Floodfill with Foreground color #008000
On the same layer / Selections / Load from disk/ltbottom1shade.sel
Floodfill with Foreground Color #004000
Selections/ Select none.
14. Layers / New Raster Layer
15. Selections / Load from disk/ leftflower1.sel
Floodfill with Foreground color #FFFF40
16. On the same layer Selections / Load from disk/leftflower1shade.sel
17. Floodfill with Foreground color #C0C000
Selections / Select None
Save.
18. Layers / New Raster Layer
19. Selections / Load from disk/ leftstem2.sel
Floodfill with Foreground color #004000
On the same layer Selections / Load from disk/ leftstem2shade.sel
Floodfill with Foreground color # 008000
Selections / Select None.
20. Layers / New Raster Layer
21. Selections / Load from disk/ ltbottom2.sel
Floodfill with Foreground Color #008000
On the same layer Selections/ Load from disk/ ltbottom2shade.sel
Floodfill with Foreground color #004000
Selections/ Select None
Save.
22. Layers/ New Raster Layer
23. Selections / Load from disk/ leftflower2.sel
Floodfill with Foreground color #FFFF40
On the same layer ...Selections / Load from disk/ltflower2shade.sel
Floodfill with Foreground Color #C0C000
Selections/ Select none
Save.
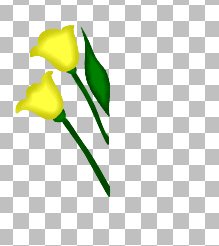
24. This is what we have so far. Now would be a good time to clear your clipboard so go to Edit/ Empty/ Command History and Clipboard.
25. Layers / New Raster Layer
26. Selections/ Load from disk/ leftleaf1.sel
Floodfill with Foreground Color #008000
On the same layer ...Selections / Load from disk/ ltleaf1shade.sel
Floodfill with Foreground Color #004000
Selections / Select None
Save.
27. Layers / New Raster Layer
28. Selections / Load From Disk/ leftleaf2.sel
Floodfill with Foreground color #008000
On the same layer Selections / Load from disk/ltleaf2shade.sel
Floodfill with Foreground Color #004000
Selections/ Select none.
Save.
29. Layers /New Raster Layer
Selections / Load from disk/ post1/sel
Making your Foreground the Wood Pattern. and these settings

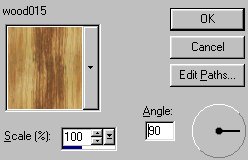
30 Floodfill your selection.
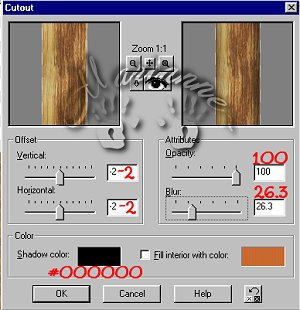
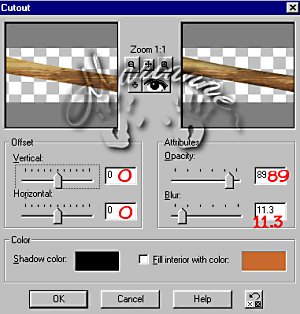
Selections / Float and apply this cutout.
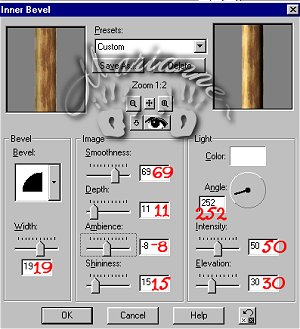
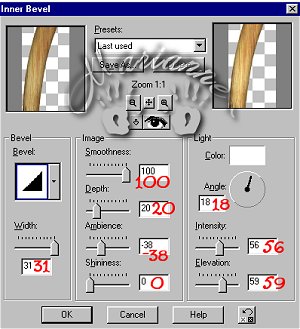
Effects/ 3D/ Inner Bevel with these settings.
31. Selections / Select None.
32. Layers / New Raster Layer.
33. Selections / Load from disk/ post2.sel
Floodfill with your wood pattern. Same settings as before.
Selections / Float apply cutout and Inner Bevel.
Selections / Select none.
Save.
34. Layers/ New Raster Layer
35. Selections / Load from disk/ lbottommail.sel
Floodfill with your wood patterns changing the angle to "0"
Selections / Float apply this cutout.
Effects / Inner Bevel/ same settings as before.
Selections / Select None.
Save.
36. This is what we have so far .........
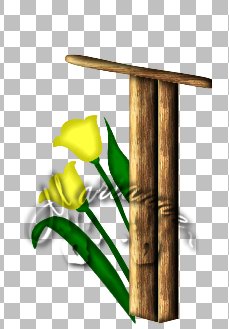
Now yours will be much bigger I reduced mine here. :) Lets keep going................
37. Layers / New Raster Layer
38. Selections / Load from disk/ lefttopmail.sel
39. Floodfill with your wood pattern changing the angle to "90"
40. Selections / Float
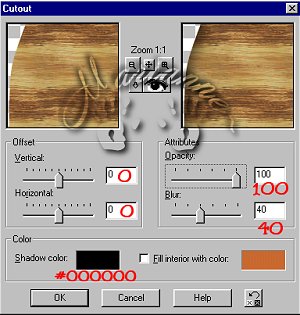
Effects / 3D / Cutout and apply same settings as before.
Effects / 3D / Inner Bevel with these settings
Selections /Select None.
Save.
41. Layers / New Raster Layer
42. Selections/ Load from disk/ midmail.sel
Floodfill with your wood color and change angel to "0"
Selections / Float
Effects / 3D / Cutout with these settings
Selections / Select none................
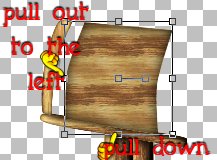
Ok here take your Deformation Tool and move this slightly down and to the right this was an error when I completed it and saw this.
Save.
Ok shewww are you still with me well lets take a stretch and move on to page 2 of this and see if we can finish it up :)
![]()
![]()