|
|
|
Spring Mailbox
Ok I am taking you came back so lets begin.....
44. Layers / New raster layer
Selections / Load from disk/ rtmail.sel
Floodfill with your wood changing angle to "90"
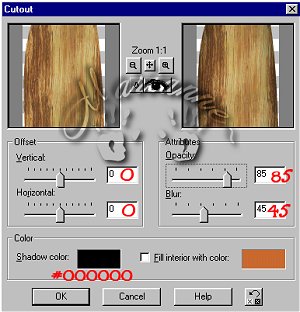
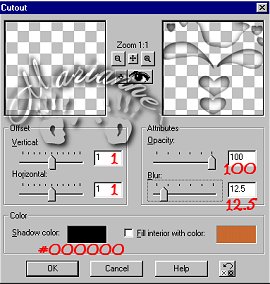
Selections / Float apply this cutout.
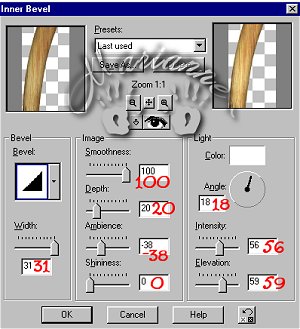
Effects / 3 D / Inner Bevel / apply these settings....
45. Selections / Select none.
46. Layers / New raster layer
Selections / Load from disk / btmailft.sel
Floodfill with your wood pattern changing the angle to "325"
Effects / 3D / Inner Bevel same settings as before.
Selections / Select None.
Save.
47. Layers / New Raster Layer
Selections / Load from disk/ frontmail.sel
Floodfill with your wood pattern and change angle to "90"
Effects / 3D / Inner bevel same settings as before.
Selections / Select None.
Save.
48. Layers / New Raster Layer
49. Selections / Load from disk/ lftsidemail.sel
Floodfill with your wood pattern.
Selections / Float
Effects /3 D/ Cutout same settings as before
Effects / 3D / Inner Bevel / same settings as before
Selections / Select None
Save.
50. Layers / New Raster Layer
Selections / Load from disk/ rtsidemail.sel
Floodfill with your wood pattern.
Selections / Float
Effects / 3D / Cutout same settings as before
Effects / 3D/ Inner Bevel same settings as before.
Selections / Select None
Save.
51. Layers /New Raster Layer
52. Selections / Load from disk/ ftmailbox.sel
Floodfill with your wood pattern
Selections / Float
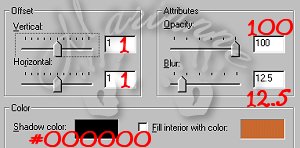
Effects / 3D / Cutout with these settings..
Selections / Select None.
53. Layers / New Raster Layer
54. Selections / Load from disk/ handle.sel
Floodfill with Foreground color #000000 (black)
Effects / 3D /Inner Bevel use the round preset.
Selections / Select none.
Save.
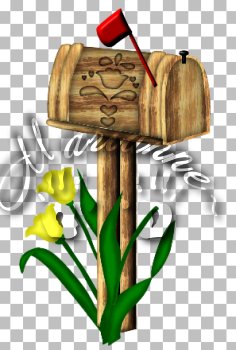
This is what we have so far. :)

Again mine is a lot smaller then yours. :)
55. Layers / New raster layer
Selections / Load from disk / mailflag.sel
Floodfill with Foreground color #800000
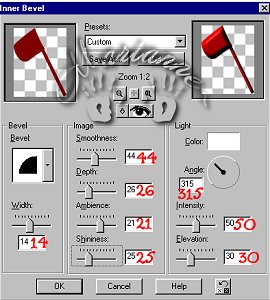
Effects / 3D / Inner Bevel with the following settings
Selections / Select None
Save.
56. Layers/ New Raster Layer
Selections / Load from disk/ maildesign.sel
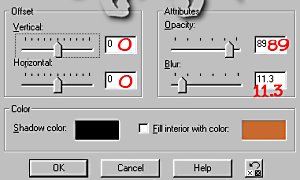
Effects / 3D / Cutout apply these settings ....
Keep selected and Add a New Raster Layer
Apply the cutout again but Change the Vert. and Horiz. to ( -1 )
Selections / Select None
Save.
57. Ok now we need to change our colors put your Foreground to color # 008000 and your Background color to #004000. It is just going to make it easier switching back and forth the next few steps. We are going to be switching off and on here so always use the lighter one first then switch to the darker one for shade. Hope this helps.
58. Layers / New Raster Layer
Selections / Load from disk/ ftleaf.sel
Floodfill with Foreground color #008000
Keep Selected.
On this layer load selection/ftleafshade.sel
Floodfill with color #004000
Selections / Select None.
Save.
59. Layers / New Raster Layer
Selections / Load from disk/ ftleaf2.sel
Floodfill with color #008000
Same layer load from selections /ftleaf2shadesel.
Floodfill with color # 004000
Selections / Select None.
Save.
60. Layers /New raster layer
Selections /Load from disk/ftleaf3.sel
Floodfill with color #008000
On the same layer load Selection / ftleaf3shade.sel
floodfill with Color #004000
Selections / Select None.
Save.
61. Layers / New Raster Layer
Selections / Load from disk/ ftstem3.sel
Floodfill with color #004000
On the same layer ... Selections/ load from disk/ ftstem3shade.sel
Floodfill with color #008000
Selections / Select None.
Save.
This is what we have so far.
62. Layers / New Raster Layer
Selections / Load from disk/ ftbotflwer3.sel
Floodfill with Color #008000
On the same layer ...... Selections / Load from disk/ftbotflwer3shade.sel
Floodfill with color #004000
Selections / Select None.
Save.
63. Layers/ New Raster Layer
Selections / Load from disk/ rtpetal1.sel
Floodfill with Color #FFFF40
On the same layer....Selections/ load from disk/ rtpetal1shade.sel
Floodfill with color #C0C000
Selections / Select None
Save.
64. Layers / New Raster Layer
Selections / Load from disk/ flowerdet.sel
Floodfill with color #C0C000
Selections/ Select None.
Save.
65. Layers / New Raster Layer
Selections / Load from disk/ mailwrit.sel
Effects / 3D / Cutout apply these settings
66. Selections / Select none.
Save.
67. Layers / New Raster Layer
68 Selections / Load from disk/ maildet2.sel
Effects/ 3D/ Cutout apply the same settings.
Selections / Select None.
Save.
We are done now :) Lets finish it up and resize.
Layers / Merge / Merge Visible.
Image / Resize making the longest side 350.
Effects / Sharpen / Sharpen.
I want to Thank You for doing my tutorial :)

Back to Tutorials
![]()
![]()