|
|
|
Ready, Set, Go!
This tutorial was written on March 12th, 2002. Any resemblence to this is purely coincidental. If you would like to use this tut in a group please just use a text link ONLY. What you make is yours to do with as you please I am only showing you how I achieved it. Many thanks goes to Loretta for helping me make this ;)
Now on with the tut.........
This is what we need to do this.........
Jasc Paint Shop Pro you can get a 20 day trial here.
My traffic light Selections here
Gradient here (Place in your Paint Shop Pro Gradients folder.)
Lets Begin
1. Open a New transparent Image 259x350
2. Floodfill with a color of your choice. We may delete this later, that will be your choice.
3. Layers / New Raster Layer
4. Selections/ Load from Disk/ backshieldmp.sel
5. Floodfill with Gradient stoplightamber_LM
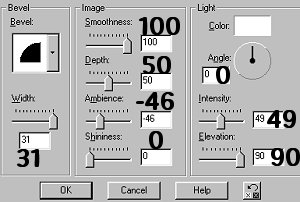
6. Go to Effects/ 3D/ Inner Bevel with these settings.
7. Selections / Select None
SAVE
8. Layers/ New Raster Layer
9. Selections / Load from disk/ sideshieldsmp.sel
10. Floodfill with gradient stoplightamber_LM
11. Apply same inner Bevel as before. Settings should still be there.
12. Selections/ Select None
SAVE
13. Layers / New Raster Layer
14. Selections/ Load from Disk/ frontlightplate.sel
15. Floodfill with Gradient stoplightamber_LM
16. Selections / Select None
SAVE
17. Layers / New Raster Layer
18. Selections / Load from disk/ redlight.sel
19. Floodfill with Color #FFoooo
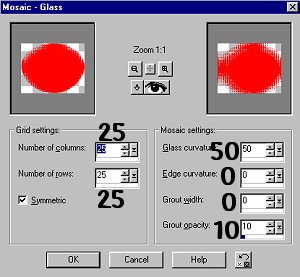
20. Go to Effects / Texture Effects/ Mosaic Glass and use these settings.
21. Selections / Select None
SAVE
22. Layers / Add New Raster Layer
23. Selections / Load from disk/ yellowlite.sel
24. Floodfill with #FFFF00
25. Go to Effects / Texture Effects/ Mosaic Glass and use the same settings as before. They will be the same.
26. Selections/ Select none.
SAVE
27. Layers/ New Raster Layer
28. Selections / Load from disk/ greenlight.sel
29. Floodfill with Color # 008000
30. Go to Effects/ Texture Effects / Mosaic Glass with the same settings as before.
31. Selections/ Select None
SAVE
32. Layers/ New Raster Layer
33. Selections/ Load from Disk/ fronttopshield.sel
34. Floodfill with Gradient stoplightamber_LM
35. Go to Effect / 3D/ Inner Bevel and apply same bevel.
36. Shift D to make a total of 3 copies.
37. On first copy, Go to your redlight layer and highlight it making it active.
38. Selections / Load from disk/ redlight.sel
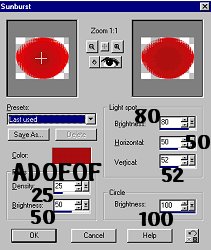
39. Go to Effects/ Illumination Effects/ Sunburst with these settings.
40. Selections / Select None
SAVE
Merge these layers. Layers/ Merge /Merge Visible.
Go to Image/ Resize making longest side 250
41. Save this as light1.psp
42. Go to your 2nd copy and highlight your yellow light layer.
43. Selections / Load from disk/ yellowlite.sel
46. Go to Effects / Illuminations Effects and use same settings but change color to #999B13
46. Selections/ Select none
SAVE
Merge these layers. Layers / Merge / Merge Visible
Go to Image / Resize making longest side 250
47. Save this image as light2.psp
48. Go to your 3rd copy and highlight your greenlight layer.
49. Go to Selections/ Select from disk/ greenlight.sel
50. Go to Effects/ Illuminations Effects/ same settings but change color to #004000.
51. Selections / Select None
SAVE
Merge these layers. Layers / Merge / Merge Visible
Go to Image/ Resize making longest size 250.
52. Save this image as light3.psp
Now lets go to Animation Shop...................
Go to File / Jasc Software Products/ Launch Animation Shop.
Go to the Animation Wizard button and click on it
then these settings , making sure these are checked.....
Same size as the first image frame then hit next, Transparent, Next
Upper Left Corner of the frame, and with the Canvas Color then hit next
Yes Repeat Animation indefinately. Then I put the number "30" in the space. Then clicked "Next"
Add your Images and hit next.
Then hit Finish
It will open up in Animation then I went to Animation
Resize and made longest side 200.
Go to View/ Animation and there ya are your own light.
Thanks so much for trying my tutorial. Any questions please feel free to contact me here.
Thanks again goes to Loretta for making the gradient and letting me know the mistakes I made along the way.
Back to Tutorials.
![]()
![]()