|
|
|
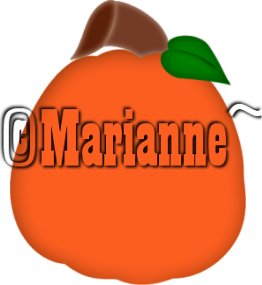
Happy Pumpkin

This tut is made from my own idle creation, please don't upload this tut or any of the samples. If you want to link to this then use the URL only. Please do not make this page or tut a Script for PSP. I made this and it is not that hard to come to the page and do the tut. Its all a learning experience. I want to Thank a great friend LORETTA for testing this for me and for always being there. She's the best ;)
Now on to the tut :)
Supplies
Jasc. Paint Shop Pro 7.04 you can get it here.
My selections you can get here.
These need to be placed in your Selections Folder in Paint Shop.
1. Open a new transparent image.
397x450
2. Layers New Raster Layer
Selections/ Load from Disk/ pbase1.sel
Flood fill with color #FC5E20
Selections / Select none.
Save
3. Layers/ New Raster Layer
Selections / Load from Disk/ pbase2.sel
Flood fill with #84350B
Selections / Select None.
4. Layers/ New Raster Layer
Selections / Load from Disk /pstem1.sel
Flood fill with color # 743C26
Selections / Select None
Selections / Load from Disk/ pstem2.sel
Flood fill with Color # CDB1A1
Selections/ Select None.
Save
5. Layers / New Raster Layer
Selections / Load from Disk/ pstem3.sel
Flood fill with color #5D2109
Selections / Select None
Selections / Load from Disk/ pstem4.sel
Flood fill with color #B1846B
Selections / Select None
6. Layers / New Raster Layer
Selections / Load from Disk / pleaf1.sel
Flood fill with color #008000
Selections / Select None
Selections / Load from disk /pleaf2.sel
Flood fill with color # 004000
Selections/ Select None
Selections / Load from disk / pleaf3.sel
Flood fill with color # 004000
Selections / Select None
Save.
This is what we should have so far. Remember yours will be bigger :)
7. Layers / New Raster Layer
Selections / Load from Disk/ pstemouth.sel
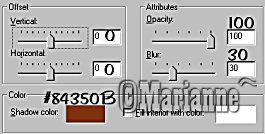
Effects / 3D Effects/ Cutout using these settings
Selections / Select None
Save
8. Layers / New Raster Layer
Selections / Load from Disk / peye1.sel
Flood fill with color #FFFFFF
Selections / Select None
9. Layers / New Raster Layer
Selections / Load from Disk / peye2.sel
Flood fill with color # FFFFFF
Selections / Select none
Save.
10. Layers / New Raster Layer
Selections / Load from Disk/ peye3.sel
Flood fill with color # 000000
Selections / Select None
11. Layers / New Raster Layer
Selections / Load from Disk / peye4.sel
Flood fill with color # 000000
Selections / Select None
Save.
12. Layers New Raster Layer
Selections / Load from Disk / peye5.sel
Flood fill with color # FFFFFF
Selections / Select None
This
is what we have so far :)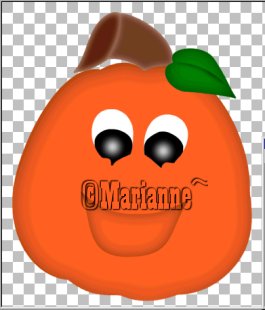
Save.
13. Layers/ New Raster Layer
Selections / Load from Disk/ pnose.sel
Flood fill with color # FF0000
Selections / Select None
Selections / Load from Disk/ pnose2.sel
Flood fill with color #FFFF00
Selections / Select None
Save
14. Layers / New Raster Layer
Selections / Load from Disk/ pbrow1.sel
Flood fill with color # 000000
Selections / Select none
Selections / Load from Disk/ pbrow2.sel
Flood fill with color # 000000
Selections/ Select None
Save
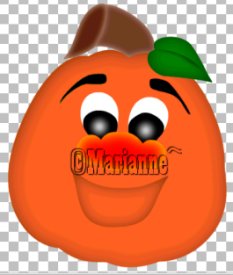
This is what we have so far :)
15. Layers / New Raster Layer
Selections / Load from Disk/ ptongue.sel
Flood fill with color #FF0000
Selections / Select None
Selections / Load from Disk/ ptongue2.sel
Flood fill with color # 8D0303
Selections / Select None
16. Layers / New Raster Layer
Selections / Load from Disk/ ptooth1.sel
Flood fill with color # FFFFFF
Selections / Select None
Selections / Load from Disk/ptooth2.sel
Flood fill with color #808080
Selections / Select None
Save.
17. Layers/ New Raster Layer
Selections/ Load from Disk/ptooth3.sel
Flood fill with color # FFFFFF
Selections / Select None
Selections /Load from Disk/ptooth4.sel
Flood fill with color # 808080
Selections / Select None.
Save.
18. Layers / New Raster Layer
Selections / Load from Disk/ details1.sel
Flood fill with color #8D0303
Selections / Select None
19. The final step I did was clicked on each eyebrow that we made
and just softened them a little by doing this. This is optional :)
Click on the Retouch Tool on your tool Palette
![]()
Then click soften and use these settings
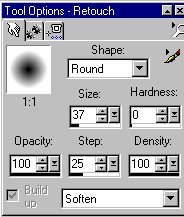
That's it now again this is optional I just thought that they looked a
little
harsh :)
I hope you enjoy this tutorial and had fun.
Any questions please feel free to email me @
MarianneP(nospam)@insight.rr.com
remove the no spam ;)
A LITTLE NOTE:
It has come to my attention that some files when trying to download get an error that you are not authorized to do it . From what I am told it is a Firewall that is blocking it so if you want then disable your Firewall and see if that helps if not let me know and I will send the selections to you.