|
|
|
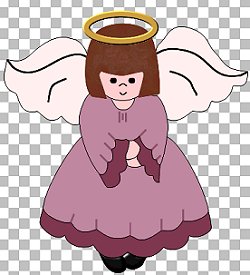
Precious Angel Girl.......

This was made by Marianne on March 10th, 2003 on my own idle time. Any resemblence to this tutorial is purely coincidental. Please do not upload this tutorial or any of the images here to your server or to any group you may link to it only. What you make out of this tutorial is yours to keep and do as you feel you want to. I am just showing you how I achieved this.
For this tutorial you will need the following............
Jasc You can get it here (this is a 30 day trial)
EyeCandy 3.1 or 4000 you can here (this is a 30 day trial)
Angel Selections here
Ok lets get started.......
Open a New Image 774x867 Transparent
This tutorial has a lot of layers so please remember to SAVE often.
1. Add a New Layer
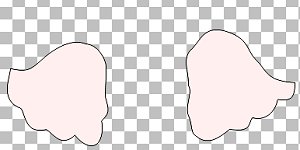
2. Selections / Load from disk / Ltwingmp.sel
3. Floodfill with Black #000000 Go to Selections / Modify / Contract 2 and then floodfill with #FEF3EC.
4. Select none.
5. Layers / New Raster Layer
6. Selections / Load from disk / rtwingangmp.sel
7. Repeat same steps as the left wing.
Save.
This is what we should have so far. :)
8. Layer / New Raster Layer
9. Selections / Load from disk / rtangshoemp.sel
10. Floodfill with Black #000000
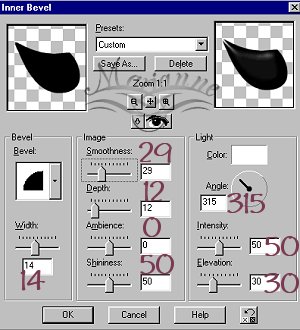
Apply the following Bevel
Effects/ 3D / Inner Bevel
Selections/ Select None
Save
11. Layers / New Raster Layer
12. Selections / Load from disk/ ltangshoemp.sel
13. Floodfill with black #000000
Apply same inner bevel as before.
Selections / Select None
Save
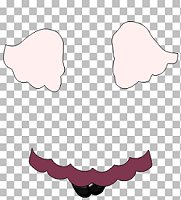
14. Layers / New Raster Layer
15. Selections / Load from Disk / dressruffleangmp.sel
16. Flood fill with Black #000000 Selections / Modify / Contract by 2
floodfill with color #78344D
17. Selections / Select none
Save
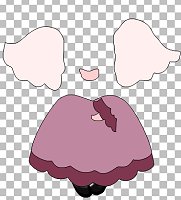
This is what we have so far .....
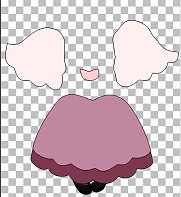
18. Layers/ New Raster Layer
19. Selections / Load from disk/ dressangmp.sel
20. Floodfill with Black #000000 Selections / Modify Contract by 2
floodfill with color #C18BA1
Selections / Select None
Save
21. Layers / New Raster Layer
22. Selections / Load from disk/ chestangmp.sel
floodfill with Black #000000 Selections/ Modify Contract by 2
floodfill with color #FFCCCC
Selections/Select None
Save
This is where we are now so far so good!
22. Layers/ New Raster Layer
23. Selections/ Load from disk/ rtangelhandmp.sel
Floodfill with Black #000000 Selections/ Modify Contract by 2
Floodfill with color #FFCCCC
Selections/ Select None
Save
24. Layers / New Raster Layer
25. Selections / Load from disk/ rtarmrufflemp.sel
Floodfill with Black #000000 Selections / Modify Contract by 2
Floodfill with Color #78344D
Selections/ Select None
Save
26. Layers/ New Raster Layer
27. Selections / Load from disk/ lthandangelmp.sel
Floodfill with Black #000000 Selections / Modify Contract by 2
Floodfill with Color #FFCCCC
Selections/ Select None
Save
28. Layers / New Raster Layer
29. Selections / Load from Disk/ ltarmrufflemp.sel
Floodfill with Black #000000 Selections / Modify Contract by 2
Floodfill with Color #78644D
Selections/ Select None
Save
30. Layers/ New Raster Layer
31. Selections / Load from disk/ topangmp.sel
Floodfill with Black #000000, Selections / Modify Contract by 2
Floodfill with Color #C18BA1
Selections / Select None
Save
32. Layers / New Raster Layer
Selections / Load from disk/ headangelmp.sel
Floodfill with Black #000000, Selections / Modify Contract by 2
Floodfill with Color #FFCCCC
Selections / Select None
Save
33. Layers New Raster Layer
Selections / Load from Disk/ angelhairmp.sel
Floodfill with Color #6B301B
Leave selected
Go to Selections / Add New Raster Layer
34. Go to your airbrush using these settings, using color #CAA595
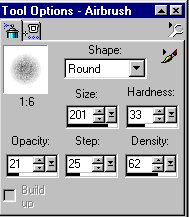
Spray lightly one click on each side of hair and at the top.
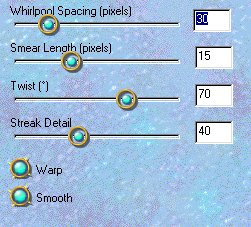
35. Go to Effects/ Plugins / Eyecandy 3.1 and choose Swirl with these settings.
Selections / Select None
Save
This just gives her hair a little color :)
36. Layers/ New Raster Layer
37. Selections / Load from Disk/ angelhalomp.sel
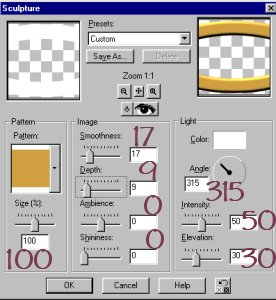
Floodfill with #FFFFFF (you can use a SuperBlade Pro gold preset here or you can use the gold texture.)
Here we will use a Gold Texture.
Go to Effects/ Texture Effects/ Sculpture Using this setting.
Ok we are almost done :)
38. Layers / New Raster Layer
Selections / Load from Disk / wingdetail.sel
Floodfill with Color #000000
Selections / Select None
Lower the Opacity on this layer to 55%
Save
Move this layer below hair.
Click on top layer on Layer Pallette
39. Layers / Add New Raster Layer
Selections / Load from Disk/ faceangmp.sel
Floodfill with color #000000
Selections / Select None
Save
40. Layers/ Add New raster Layer
Selections / Load from Disk/ dressdetailmp.sel
Floodfill with Color #78344D Lower the Opacity to 70%
This is what we have so far.
41.Now we need to finsih it up.
Lets go to the bottom layer we have and add a background to it.
After you do that Merge all layers Layers / Merge Visible
Resize
Thats it! I hope you enjoyed this tutorial as I have making it.
Thanks to my good buddy Loretta for helping me do this ;)
Any Questions please Email Me
Tuesday, March 11, 2003 11:36:03
Back to Tutorials
![]()
![]()