|
|
|
Santa

This tutorial was made by Marianne~ on Oct 18th,2003. Any coincidence is purely unintentional. It was made by an idea I was having and thought of. Please do not take any images off this site as they are mine your finished graphic is yours. I am simply going to show you how I did mine and achieved it. Thanks for trying my tut.This is a kinda repiticious tut so I hope you will keep going for the final effect :)
Now on to the tut!
Supplies
Jasc Paint Shop Pro 7 you can get it here
Eyecandy 4000 you can get it here.
It is workable with Version 3.1 and I include settings for it :)
My Selections you can get here.
My color Swatch Just right click and save to your computer.

Ok now that we have it all let's begin.
Open a new image 365 x 530
Transparent
1. Add a New Raster Layer. Layers / New Raster Layer
2. Go to Selections/ Load from disk and load bottomfurmp.sel
Flood fill with Swatch # 5 (color white #OOOOOO)
Selections / Invert
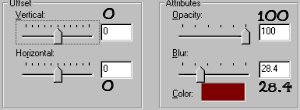
Go to Effects / 3D Effects/ Drop Shadow/ using these settings
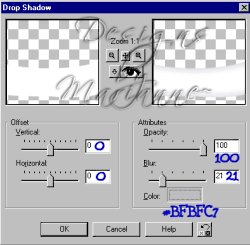
Hit ok.
Selections/ Select None
Go to Effects / Plugins/ Eyecandy 4000 / Jiggle and use these settings
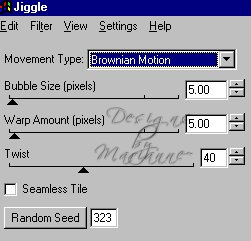
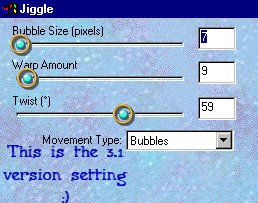
These settings will always be the same so I will just say apply Jiggle from here on out.
2. Layers /New Raster Layer
3. Go to Selections / Load from disk and load santacoatmp.sel
Flood fill with Swatch # 1 (color red # FF0000)
Selections / Invert
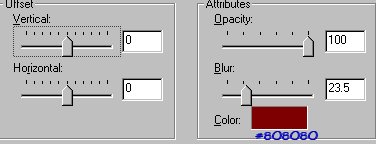
Effects / 3D Effects/ Drop Shadow/ with same settings as before but change color
to # 800000 and Blur to 45.3
Selections / Invert
Effects / Noise / Add using these settings
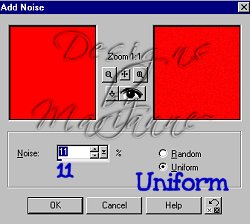
Selections/ Select None
4.Layers/ New Raster Layer
Selections / Load from disk / list1mp.sel
Flood fill with color swatch # 3 (light tan #D9C0A7)
Selections / Invert
Effects / 3D Effects / Drop Shadow
using these settings
Selections / Invert/ Effects/ Noise / Add
same settings as before.
Selections / Select None.
5. Layers / New Raster Layer
Selections / Load from Disk/ listcornermp.sel
Flood fill with Swatch # 3
Selections / Invert / Effects / 3D Effects / Drop Shadow
same settings but change blur to 4.9
Selections / Select None
6. Layers / New Raster Layer
Selections / Load from Disk / listsflipmp.sel
Flood fill with color # 3
Selections/ Invert/ Effects / 3D Effects / Drop Shadow
Same settings as before changing Blur to 13.6
Selections / Invert
Effects / Noise / Add same setting
Selections / Select None
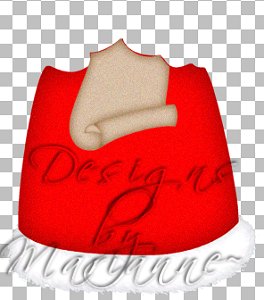
This is what we have so far :)
7.Layers / New Raster Layer
Selections / Load from disk / facemp.sel
Flood fill with color swatch # 6 (#FDE9D5)
Selections / Invert
Effects / 3D Effects / Drop shadow
Same settings but change Blur to 23.5 and change color to
swatch # 7 (color #E5B283 )
Selections / Select none.
8. Layers/ Add New Raster
Selections / Load from Disk / leftsleevemp.sel
Flood fill with Color swatch # 1 (# FF0000)
Selections / Invert
Effects / 3D Effects/ Drop Shadow
same settings as we just used changing color to
Swatch # 2 (#800000)
Selections / Invert
Effects / Noise / Add
same setting as we used .
Selections / Select None.
9. Layer / New Raster Layer
Selections / Load from disk / leftcuffmp.sel
Flood fill with Swatch #5 (color #FFFFFF)
Selections / Invert
Effects / 3D Effects / Drop Shadow
Same settings as before but change color to #C0C0C0
Selections / Select none
Effects / Plugins / Eyecandy 4000
Apply your Jiggle Setting.
10. Layers / New Raster Layer
Selections / Load from disk / rightsleevemp.sel
Flood fill with Color Swatch 1 (#FF0000)
Selections / Invert
Effects / 3D Effects / Drop shadow
same settings as before but change color to swatch #2 (#800000)
Selections / Invert
Effects / Noise
same settings as before.
11. Layers / Add New Raster Layer
Selections / Load from Disk / rightcuffmp.sel
Flood fill with swatch # 5 (#FFFFFF)
Selections / Invert
Effects / Drop Shadow
Same settings but change color to #9 (#C0C0C0)
Selections / Select None
Effects / Plugins / Eyecandy 4000
your Jiggle Settings.
12. Layers / New Raster Layer
Selections / Load from Disk / beardmp.sel
Floodfill with swatch #5
Selections / Invert
Effects / 3D Effects/ Drop Shadow
same settings as before changing color to #8 (#808082) .
Selections / Select None
Effects / Plugins / Eyecandy 4000
apply your Jiggle settings.
13. Layers / New Raster Layer
Selections / Load from disk / toplistmp.sel
Flood fill with swatch #3 (#D9C1A9)
Selections / Invert
Effects / 3D Effects / Drop shadow
Using same settings but changing color to
swatch #4 (#845324)
Selections / Invert
Effects / Noise / Add
same settings as before.
Selections / Select none.
14. Layers / New Raster Layer
Selections / Load from Disk / leftglovemp.sel
Flood fill with swatch #5 (FFFFFF)
Selections / Invert
Effects / 3D Effects / Drop Shadow
using these settings.
Selections / Invert
Effects / Noise / Add
Same settings
15. Layers / New Raster Layer
Selections / Load from disk / rightglovemp.sel
Flood fill with swatch # 5 (#FFFFFF)
Selections / Invert
Effects / 3D Effects / Drop Shadow
same settings as before.
Selections / Invert
Effects / Noise / Add
Same settings.
Selections / Select None.
16. Layers / New Raster Layer
Selections / Load from disk / mustachemp.sel
Flood fill with swatch # 5
Selections / Invert
Effects / 3D Effects / Drop Shadow
Same settings but change color to Swatch #8 (#808082)
Selections / Select None
Effects / Plugins / Eyecandy 4000
Apply your Jiggle setting.
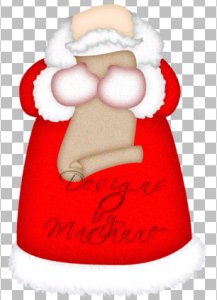
OK almost done hope your still with me :)
This is what we have so far.
17. Layers / New Raster Layer
Selections / Load from disk / slefteyemp.sel
Flood fill with #000000 (black)
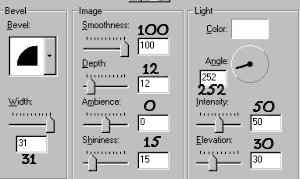
Effects / 3D Effects / Inner Bevel
Use the round preset
Selections / Select None.
Go to Layers / Duplicate
Image/ Mirror
move his eye over slightly to the left.
**Note : We may have to move this once we put his eyebrows in :) **
18. Layers / New Raster Layer
Selections / Load from Disk / leftbrowmp.sel
Flood fill with Swatch #5
Selections / Invert
Effects / 3D Effects / Drop Shadow
same settings as before changing Blur to 4.9 and color to #C0C0C0
Selections / Select None
Apply your Jiggle setting.
19.Layers / New Raster Layer
Selections / Load from Disk / rtbrowmp.sel
Flood fill with Swatch #5
Selections / Invert
Effects / 3D Effects / Drop Shadow
same settings as before changing Blur to 4.9 and color to #C0C0C0
Selections / Select None
Apply your Jiggle setting.
20. Layers / New Raster Layer
Selections / Load from disk / snosemp.sel
Flood fill with swatch # 6 (#FEE9D6)
Selections / Invert
Effects / 3D Effects / Drop Shadow
Using same settings change color to
#E5B283
Selections / Invert
Effects / 3D Effects / Inner Bevel
Use these settings.
Selections / Select None.
21.Layers / New Raster Layer
Selections / Load from disk / hat1mp.sel
Flood fill with swatch # 1
Selections / Invert
Effects / 3D Effects /Drop Shadow
Using this setting color swatch # 2 (808080)
Selections / Invert
Effects / Noise / Add
same setting as before.
Selections / Select None
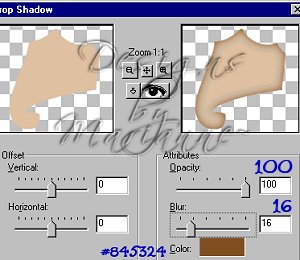
22. Layers / New Raster Layer
Selections / Load from disk / hat2mp.sel
Flood fill with swatch # 1
Selections / Invert
Effects / 3D Effects /Drop Shadow
Using this setting color swatch # 2 (808080)
and change the Blur to 16
Selections / Invert
Effects / Noise / Add
same settings as before.
Selections / Select None
23. Layers / New Raster Layer
Selections / Load from disk / hat3mp.sel
Flood fill with swatch # 1
Selections / Invert
Effects / 3D Effects /Drop Shadow
Using this setting color swatch # 2 (808080)
and change the Blur to 16
Selections / Invert
Effects / Noise / Add
same settings as before.
Selections / Select None
24. Layers / New Raster Layer
Selections / Load from disk / hat4mp.sel
Flood fill with swatch # 1
Selections / Invert
Effects / 3D Effects /Drop Shadow
Using this setting color swatch # 2 (808080)
and change the Blur to 16
Selections / Invert
Effects / Noise / Add
same settings as before.
Selections / Select None
25. Layers / New Raster Layer
Selections / Load from disk / tasslehatmp.sel
Flood fill with swatch # 5
Selections / Invert
Effects / 3D Effects /Drop Shadow
Using this setting color swatch # 2 (808080)
and change the Blur to 8.6
Selections / Select None
Effects / Plugins / Eyecandy 4000
Jiggle Setting.
26. Layers / New Raster Layer
Selections / Load from disk / sdetailsmp.sel
Flood fill with swatch # 5
Selections / Select None
That's it we are all done now you can merge all your layers and tube if you so choose.
Thanks for trying my tut and remember if your sending it in to a group please resize :)
Thanks Loretta for all the help in testing :)
Any problems email me @ Mariannep @insight.rr.com
Thanks so much :)
Hugs