|
|
|
Ghost Pumpkin Tut
This tutorial was written on Aug. 20th 2003. It was created by me and please do not upload any examples or images from this site. If you would like to link to this tutorial please text link only.Thanks so much for trying my tut :)
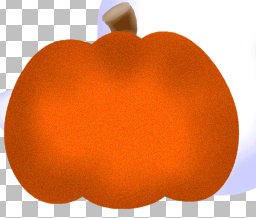
This is what we will be making today :)

Now on to the tut.
I am using Paint Shop Pro Ver.7 for this you can get a trial version here.
Supplies
Color Swatch (just right click and save to your computer or right click and copy and paste into Paint Shop.
You will need my zip.Get it here
Open the file extract the selections to your PSP Selections folder and then I have also included the eyes I used for mine and double click those and open in Paint Shop.
Now we are ready to begin.
1) Open a New transparent Image 366 x 450
2.) Go to Layers / New Raster Layer
3.)Go to Selections/ Load From Disk/ Ghost.sel
Flood fill with White ( #FFFFFF)
Selections / Select None.
4.) On the same layer Go to Selections / Load from disk / ghostshading.sel
Floodfill it with the lite blue ( #C0C0FF )
Deselect.
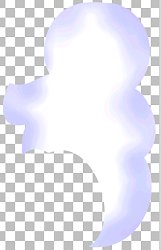
This is what we should have so far. Yours will be much bigger :)
5.) Layers / New Raster Layer
Go to Selections / Load from disk/ ghosttail.sel
Floodfill with white ( #FFFFFF )
Deselect
6.) On the same layer Go to Selections / Load from disk / and load the ghosttailshading.sel.
Floodfill it with the lt.blue ( #C0C0FF )
Deselect.
7.Layers / New Raster Layer
Go to Selections / Load from disk/ stem.sel
Floodfill it with dk. brown ( #6b3909 )
Selections/ Select none
On the same layer Go to Selections / Load from disk/ stemshading.sel
Floodfill with lt.brown ( #D2BEAA )
Selections / Select None.
7.) Layers / New Raster Layer
Go to Selections / Load from Disk / stemtop.sel
floodfill with lt. brown ( # D2BEAA )
Deselect
8.) On the same layer Go to Selections/ Load from disk/ stemtopshading.sel
Floodfill with dk.brown ( #6B3909 )
Selections / Select None.

9.) Layers / New Raster Layer
Go to Selections / Load from disk / pumpkin.sel
Floodfill with Orange ( #FA6206 )
Selections / Select None
On the same layer Go to Selections / Load from disk/ pumpkinshade.sel
Floodfill with color DK orange ( #A73F01 )
Selections / Select None.
Now I added Noise here this is your option. If you want to go to Effects / Noise / Add and use these settings :)

10.) Layers/ New Raster Layer
Go to Selections / Load from disk /lefthand.sel
Floodfill with white ( #FFFFFF )
Deselect.
On the same layer go to Selections / Load from disk / lefthandshading.sel
Floodfill with lt.blue ( #C0C0FF )
Deselect
11.) Layers / New Raster Layer
Go to Selections / Load from Disk/ righthand.sel
Floodfill with white ( #FFFFFF )
Deselect
On the same Layer go to Selections / Load from disk / righthandshading.sel
Floodfill with Lt. blue ( #C0C0FF )
Deselect.

Are you still with me ? We are almost done :)
12.) Layers/ New Raster Layer
Go to Selections / Load from disk / mouth.sel
Floodfill with Black ( #000000 )
Deselect
13. Layers / New Raster Layer
Go to Selections / Load from disk / pumkinnose.sel
Floodfill with Dk.orange ( #A73F01 )
Deselect.

On the same layer go to Selections / Load from Disk / ghostdetail.sel
floodfill with ( #C0C0FF )
Deselect.
14.) Layers / New Raster Layer
Go to Selections / Load from Disk / pumpkindetail.sel
Floodfill with color dk.orange ( #A73F01 )
Selections / Select None
15.) Layers / New Raster Layer
This is the time for the eyes :)
Go to the pumkin eyes and Click on them go to Edit / Copy now click on our image we are making and Edit / Paste as New selection
Selections / Select None.
16.) Layers / New Raster Layer
Go to the Ghost eyes and Click on them to make active and go to Edit / Copy now click on the image we are making and Go to Edit / Paste as New selection.
Selections / Select None.
Now you can tube or merge your layers and resize. I hope you have enjoyed this tut and I want to "Thank" Loretta for helping me make this one. At least staying on me till I got it done LOL.
Here is your finished product :)

Any questions please email me @ MarianneP@insight.rr.com
Back to Tutorials